Custom Funko Pop Tutorial
I’ll be using Simon & Baz as examples but just know they are rather advanced Pop-ery - not all pops are this complicated or difficult. But most of the info below is relevant to any custom pop you may want to make. Even if you're not making Simon & Baz, do read through the entire tutorial as there are relevant tips throughout.
Leave a comment below if you have any questions or requests for anything you want to see that I haven’t included here.
❤ ❤ ❤
STUFF YOU’LL NEED
Paper towels
Cups that fit a funko pop inside (one cup per funko pop)
Boiling hot water
Acrylic paints & paint brushes (if painting is required)
Optional but recommended:
Box cutter/X-acto knife
Super glue (the gel kind, *not* the liquid)
Toothpicks (helpful for small detail paint work & clean-up)
Matte Finish spray

Here's the Pops I'm working with to create this specific Simon Snow & Baz Pitch project (below):

The pops are (from L to R):
Goliath (Gargoyles), Roman Sionis, Dawson (Dawson's Creek), Newt Scamander, Patrick Bateman.
I am using a different pop for Simon's body here than I used on my first set. It was a piece I already had available left over from another project. But, as with any custom pop project, you can choose whichever pops you want to use that create the characters as you envision them!
❤ ❤ ❤
The set up:
One cup per funko pop.
(I sit my cups on trivets because they get really hot once the water is poured in.)

Put the pops in the cups (below)

Next you'll want to boil a kettle full of water, about 2 Qt of water. (More or less depending on how many pops you're working with and how much you fill the cups. I just fill up my kettle.)
IMPORTANT: Once the water gets to boiling, pour enough water into each cup to cover the neck joint. The neck joint and bottom of the head need to be softened in order to pull them apart. The boiling hot water softens the plastic quite a bit.


Let the pops sit COVERED in the hot water for 5 minutes.

After they've soaked for 5 minutes, carefully remove the pop from the cup of water.
Using a paper towel to protect your hand, gently pull the head from the body.
Wiggle, twist, and pull.


*Note: older Pops are made differently from newer Pops. Newer ones may have oddly shaped neck discs. (See below.) Because the discs no longer fit universally, it's a good idea to always remove the disc along with the head. Sometimes (not often, but sometimes) the glue will melt in the hot water and the disc will detach from the head during removal. That's okay. Pull the head off then pull the disc off separately if you need to. But be sure to remove the disc from the neck stem. (This also makes painting the body easier.)


So here's where we are after we remove all the heads from the bodies:

Just set aside the parts you're not using. You won't be needing them here.
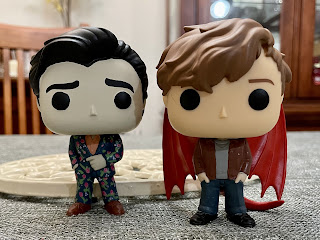
Here's Simon and Baz before they're painted and assembled:

Normally at this point the hard part is over. Once you've got the Pops disassembled, all that's left to do is to paint the pieces how you want (if that's even necessary; sometimes it's not, it's up to you!) and reassembling them by gently pushing/twisting the head onto the neck.
[Here’s where things get specific.]
Today we're making Simon Snow and Baz Pitch and they are beautiful complicated divas who won't settle for simplicity.
I chose to make Simon with his dragon wings & tail and the Baz from Wayward Son with his pretty pretty floral suit. So starting with Simon, lets focus on how we get the wings and tail.
I used Goliath from Gargoyles to provide Simon's wings and tail. And let me tell you, this guy does not part with his wings easily. (Goliath is pictured below freshly pulled from his hot water soak.)

After soaking (to soften the plastic), I first remove the head simply because it makes it easier to work with by not having to maneuver around his big noggin. But this is optional.
Second, I use some pliers to remove the tail. Get a good grip and twist back and forth until it comes off. (*Remember, this is only MY technique. Feel free to do what works for you.)


Next you'll need to remove the wings. This is the hardest part. I've done this three times and they have come off differently each time. The first time I was able to pull them off with pliers. (Be careful not to damage the wings with the pliers if you try this.)
The other two times I've had to cut them off and not only is this harder but it is dangerous. I don't recommend it if you can get them off another way. But here I used my box cutter (which has a big handle for a secure grip) to slowly and carefully saw them off.

Remember, too, that the way you cut them off will affect the way they attach to the body. Once they're removed, you may need to shave a bit more off so that it sits properly against the body and attaches well.
After you get the wings off Goliath (but before you paint them), play around with holding them up to the body they're getting attached to so you can see how they're going to fit. You'll want to check what angle each wing is sitting at (they can appear more closed or more open depending on how they're placed), and if they will attach evenly (you don't want one hanging lower than the other. Or maybe you do. You get to decide. These are just things to think about.)

Now we paint!

Below: mixing just the right shade of blue for Simon's jeans

Below: Now Simon's whole body is painted, it's time to attach the wings. Eep.

Once you've decided how the wings will attach, you'll use superglue (the GEL kind, NOT the liquid kind) to adhere each one to the body, one at a time. I recommend putting the glue on the wing, then when it's begun to secure itself to the body, you can fill in spots around the base of the wing with extra glue to secure it further.
When the wings are securely attached and have had some time to dry, you can put some glue on the tail and attach it. If you're lucky, you may be able to place it in such a way that allows it to provide some stability to Simon so he doesn't fall over. (The wings add extra weight and change the balance of the pop so he doesn't always stand on his own.)

Another thing to consider when creating Simon is his moles. I used the tip of a toothpick to place tiny dots of brown paint to replicate his moles in the places the book specifically mentions. I've seen other people's versions of Simon that have a whole face full of moles and freckles. This is another way to customize your pop the way you want. You get to choose whether to include these and how many and where to put them.
Next we move onto Baz.
Seeing as Baz is a vampire, you'll likely want to lighten his skin color a little. I made him a few shades paler than Simon.
PRO TIP: Once you've got your paint mixed (if necessary), add a couple drops of water so it's just thin enough to not leave streaks when you brush it on.

Once his face paint is dry, you'll need to paint on his eyebrows and eyes. This is not easy. There's not a lot of advice I can give you on this other than just trial-and-error it. Painting is absolutely not my forte so maybe you'll be better at it than me. Practice really does help though. I finally got a pretty good result on my third Baz. *eyeroll*

Next, paint his hair, taking care to create his infamous widow's peak.

Aaaaaand now we paint the body.
There's 4 parts to this:
- the shoes
- the shirt
- the hand (save some of that skin-tone paint for this)
- the suit.

For the suit, once you get the navy blue base finished,
here's the order of how I painted the elements of the pattern:
1. Vines and leaves in light green
2. Flowers in pink
3. Flower petal detail (to create depth) in dark pink/red
4. Dots in lavender/white
(For reference:)


As with any custom pop, once the body and head are thoroughly dry, gently push the head onto the body and they're done.
One more step that is entirely optional is spraying the entire pop with several coats of a matte finish. Some paints and pops are shiner than others and I personally don't like it when they shine. And the matte finish helps protect the paint job.
This isn't the EXACT order I did everything in, of course, because I was doing both Simon and Baz simultaneously so when one was drying I was working on the other. So the steps aren't strict. It's more of a general guideline of steps. Do what works for you.
I hope this was helpful. Let me know if any of you out there decide to try making your own pops! I would love to see them!


Love this whole thing! ❤️🤩❤️
ReplyDelete